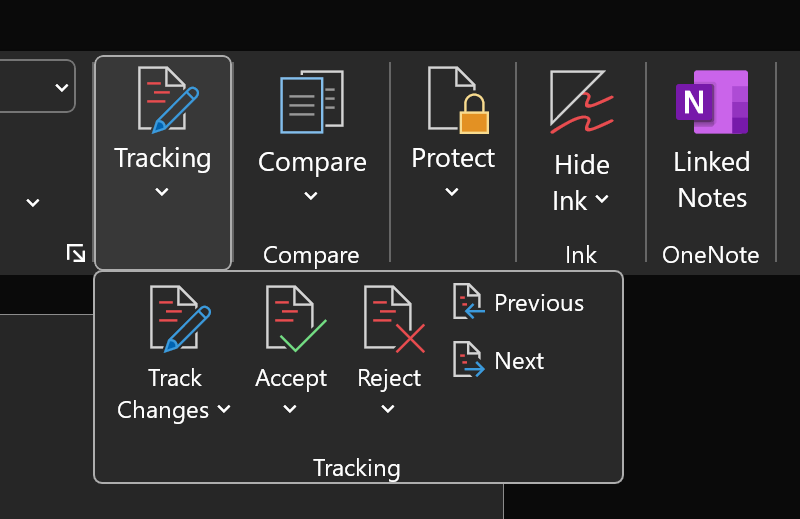
Microsoft Word’s Track Changes feature is a lifesaver when collaborating on documents, but it can become a hassle if you’re ready to finalize and share your work. Leaving tracked changes visible can make your document appear unprofessional, revealing editing history that you’d rather keep private. If you’re wondering how to permanently remove track changes in Word, this guide is for you.
In this article, we’ll walk you through the process of removing track changes step by step. You’ll also find tips for preventing them from reappearing and maintaining a polished, professional document.
What Are Track Changes in Word?
Track Changes is a feature in Microsoft Word that records edits made to a document. This includes insertions, deletions, formatting changes, and comments. It’s particularly useful for collaborative projects, as it allows multiple users to see and review changes.
However, if you’ve finalized your edits and are ready to share the document, you’ll want to clean it up by accepting or rejecting all changes and turning off the feature entirely.
Why Remove Track Changes?
There are several reasons to remove track changes before sharing your document:
- Professionalism: Tracked changes can make your document look incomplete or unpolished.
- Confidentiality: Leaving visible edits or comments may inadvertently share sensitive information.
- Clarity: A clean document is easier to read and understand.
By removing track changes, you ensure that the final version of your document reflects a polished, finalized product.
Step 1: Open the Document
First, open the document in Microsoft Word that contains the tracked changes. Make sure you’re using a compatible version of Word, as the interface may vary slightly between versions.
Pro Tip: Always create a backup copy of your document before making significant changes.
Step 2: Review Tracked Changes
Before removing track changes, it’s essential to review all edits to ensure you’re satisfied with the changes. Follow these steps:
- Navigate to the Review tab in the toolbar.
- Click Next or Previous under the Changes group to move through each change.
- Decide whether to accept or reject each change:
- Click Accept to incorporate the change into the document.
- Click Reject to discard the change.
This step ensures you have control over what stays in your document.
Step 3: Accept or Reject All Changes
If you’re confident that all changes should be accepted or rejected, you can speed up the process by doing so in bulk:
- Go to the Review tab.
- In the Changes group, click the dropdown arrow next to Accept or Reject.
- Select Accept All Changes or Reject All Changes from the menu.
This action finalizes all edits in one go, leaving no remaining tracked changes.
Step 4: Turn Off Track Changes
Once all changes are addressed, you’ll need to turn off the Track Changes feature:
- In the Review tab, locate the Track Changes button.
- Click the button to toggle it off. When the feature is off, the button will no longer be highlighted.
Turning off Track Changes ensures that any future edits are not tracked automatically.
Step 5: Remove Comments
If your document includes comments, you’ll want to delete them as well:
- In the Review tab, click Next in the Comments group to navigate to the first comment.
- Click Delete to remove the comment.
- Use the Delete All Comments in Document option to remove all comments at once.
Removing comments is crucial for presenting a clean document.
Step 6: Save the Final Document
After addressing all changes and comments, save your document to preserve the final version:
- Click File in the top-left corner.
- Select Save As and choose a descriptive file name.
- Save your document in the desired format (e.g., .docx, PDF).
Quick Tip: Consider saving your file as a PDF to lock the formatting and prevent further edits.
Common Mistakes to Avoid
- Leaving Changes Visible: Ensure you’ve accepted or rejected all changes before sharing the document.
- Forgetting to Turn Off Track Changes: Even after accepting changes, leaving the feature on will track new edits.
- Overlooking Comments: Comments can be easily missed but are just as important to remove.
How to Prevent Track Changes from Reappearing
To avoid track changes reappearing in the future, follow these tips:
- Turn Off Track Changes by Default:
- Go to File > Options > Trust Center > Trust Center Settings.
- Under Privacy Options, disable features that enable tracking.
- Share Final Versions Only: Always share the finalized document to ensure no tracked changes are visible.
- Use PDFs: Sharing a PDF version of your document locks the content and prevents further edits.
Final Thoughts
Removing track changes in Microsoft Word is essential for producing a professional, polished document. By following the steps outlined in this guide, you can ensure your document is clean, clear, and ready to share.
For more tips on mastering Microsoft Word, check out Microsoft’s official documentation on Track Changes. Whether you’re a student, professional, or creative writer, learning to manage tracked changes effectively is a skill that will serve you well.
Got questions or additional tips? Share them in the comments below!